I've been doing art and crafts for the dominant portion of my life and even have a BFA, but life has a way of sending you down a different path than the one you originally intended. Lately, I have found myself with more time to attend to me and what I love . . . ART. That sort of thing happens as your children grow up and need you less and less. I used to think 'time for myself' was a fictional thing and am now pleasantly surprised that it actually exists.
So now it's time to get serious about what I want to do with it. I love to figure things out. It's a great flaw and advantage I have. I'm constantly discovering new things, but the constant motion of discovery keeps me from settling on a medium I'm completely content with. I'm a clumsy painter and can hardly draw anything realistic; but that does not stop me from wondering how to make paint peel and crawl, and make my own charcoal, chalks, and glazes. Hence every piece I make is process oriented, sometimes goes through many metamorphosis and ends up being mixed media.
So I have decided to share my discoveries and treasures with people that can use them the most. In the following weeks you will find interesting articles and things I find on the web, tricks I discovered on my own or with friends, or things I know but can't remember where I learned them.
So on with the much anticipated content:
DIY Texture Mats for Clay
This is my favorite and most recent discovery! Silicone texture mats are expensive and everyone seems to be using the same mats as you. With this method you can create your own temporary mats easily and use them to craft unique polymer clay, metal clay, and ceramic projects. At home I roll these right through my slab roller along with clay in my ceramic studio.
Here’s what you need:


As a final note. Please excuse the mess on this Blog. I'm still deciding on layout, background and links.
Happy Crafting!
---Rebecca aka muddyfoot
So now it's time to get serious about what I want to do with it. I love to figure things out. It's a great flaw and advantage I have. I'm constantly discovering new things, but the constant motion of discovery keeps me from settling on a medium I'm completely content with. I'm a clumsy painter and can hardly draw anything realistic; but that does not stop me from wondering how to make paint peel and crawl, and make my own charcoal, chalks, and glazes. Hence every piece I make is process oriented, sometimes goes through many metamorphosis and ends up being mixed media.
So I have decided to share my discoveries and treasures with people that can use them the most. In the following weeks you will find interesting articles and things I find on the web, tricks I discovered on my own or with friends, or things I know but can't remember where I learned them.
So on with the much anticipated content:
DIY Texture Mats for Clay
This is my favorite and most recent discovery! Silicone texture mats are expensive and everyone seems to be using the same mats as you. With this method you can create your own temporary mats easily and use them to craft unique polymer clay, metal clay, and ceramic projects. At home I roll these right through my slab roller along with clay in my ceramic studio.
Here’s what you need:

- polystyrene sheets: You can buy these in bulk from a foam manufacturer in a variety of sizes. If you purchase from a manufacturer be sure to get sheets no thicker than 3mm. You can also save and collect meat packing trays from the supermarket. Just cut the vertical sides off so you are left with a flat sheet.
- masking or scotch tape
- a pencil (slightly blunt)
- your design, printed or drawn pattern on plain paper. You can also work freehand directly on the polystyrene.
- Tape your foam sheet to a table or firm surface.

- If you are using a printed design lay your design paper over the foam sheet and tape it in place as well so it doesn't shift while you transfer it. If you've decided to work freehand, go ahead and draw your design on the foam board.

- Draw over your design with a slightly blunt pencil; using enough force to press your design into the foam. Depending on your image, it's sometimes important to know that the negative spaces (the "clear" areas of the paper you don't draw over) will become raised areas on the foam; but later when you press the foam into the clay those same areas will be recessed in the clay!

- Once you're finished tracing the design, remove the design sheet. You should see your design imprinted on the foam.
- Using the pencil, go over the design again to make the recessed areas more pronounced.

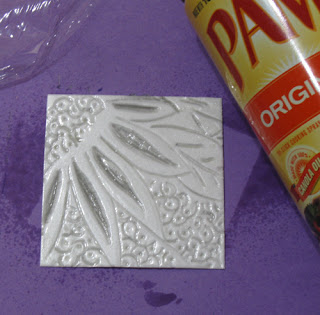
- Before using your design, lightly spray it with cooking oil or gently rub beeswax over it, being careful to get inside each crevice of your texture mat. This will help you remove the mat from the clay when you're finished. Too much oil or wax will cause problems -- the mat could slide around while you're working. Too much oil or wax can also leave unwanted marks on your clay.

- Use your mat to texture your clay just as you would with a silicone mat. Remember these mats are delicate, so handle them carefully to avoid unwanted scratches. Polystyrene mats are not as flexible as a silicone mat, either. If your mat sticks to the clay slab, gently peel the clay away from the mat. (Pulling the mat from the clay could hurt the mat, so be careful to pull on the clay.) If clay gums up the mat's recesses, gently wash it with warm soap and water. If necessary, scrub very gently with a soft brush. You can use each mats about a dozen times before it degrades too much to use. Store mats between sheets of clean cardstock in a dust-free, out-of-the-way location. Be careful not to put anything on top of the mats -- a few days under a thick book (for example) will flatten and reduce the relief of your design.

As a final note. Please excuse the mess on this Blog. I'm still deciding on layout, background and links.
Happy Crafting!
---Rebecca aka muddyfoot
No comments:
Post a Comment