It has occurred to me that I have not done a DIY post for this week yet; so I'm going to do something simple since the post I originally wanted to do is giving me some heart break.
Not to fear, it will still get posted in the next couple of weeks. I'm having a series of tool malfunctions . . broken Dremel bits, smashed fingers, missing tools. I won't go into details here.
Anyway, here is a simple and useful trick to make jewelry tags for necklaces, bracelets, and brooches using Shrinky Dink.

The secret is to keep your design very simple. Anything complicated gets lost when the tags are shrunk.
I use White Shrinky Dink plastic, you can also use the Shrinky Dink Ink Jet plastic, but since your tags will be very tiny you may as well save a few dollars and simply purchase the white plastic. I don't like to use the clear plastic. it looks a bit flimsy to me, even when shrunk.
In addition to shrink plastic you will need:

Shrinky Dinks shrink approximately 1/3 their size. I use a standard hand-held hole punch (6mm hole size) to make the holes for jump rings, so my starting un-shrunk width needs to be at least 10 mm to give a nice sturdy border of 2mm around the hole. I'll make the overall length 30mm to get a nice rectangle.
Here is a template for an oval tag and a round tag. Right click to copy it and then paste it into Microsoft Word so you can print it Then transfer it to your shrink plastic by tracing. Or print this page at normal size to get the correct dimensions.

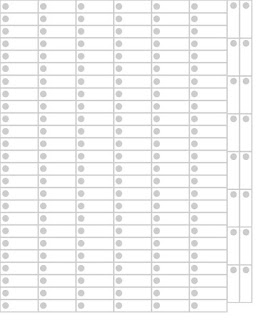
Here are templates for the Ink Jet Shrinky Dink paper. They contain 166 tags each. Their Original size is 72 pixles/inch on an 8"x10" canvass. I intentionally made the borders very light so it's won't show up much upon printing and shrinking. This way you can go over it and add your own color border or graphics.
 Trace lightly. You will be erasing the pencil marks before shrinking. To trace a template tape the template over the glass of a sunny window. Then stack your shrink plastic over it. Trace the lines you see through the plastic with your pencil.
Once you have your template traced (or printed, follow the instructions that comes with your Shrinky DInk Ink Jet paper) begin decorating or signing your name on each tag. Sharpie brand Fine Point Permanent Markers work best and won't smudge even after shrinking. They also come in a variety of colors. I simply sign and date a tag once I have completed a piece of jewelry. Then shrink the tag in my toaster oven and attach it to the piece with jump rings.

Before shrinking be sure all tags are cut out and holes are punched. Punch the holes with a standard 1/4", light duty, hand held hole punch. Pardon my sloppy rounded edges. I started with the square template but decided I wanted round after they were cut out.

Erase the pencil marks once the tags are cut out. Now follow the instructions for shrinking your plastic. Assuming you used White Shrinky Dink brand shrink plastic, follow the Shrinky Dink Shrinking Baking Instructions
Your finished product will look something like this:

Not to fear, it will still get posted in the next couple of weeks. I'm having a series of tool malfunctions . . broken Dremel bits, smashed fingers, missing tools. I won't go into details here.
Anyway, here is a simple and useful trick to make jewelry tags for necklaces, bracelets, and brooches using Shrinky Dink.

The secret is to keep your design very simple. Anything complicated gets lost when the tags are shrunk.
I use White Shrinky Dink plastic, you can also use the Shrinky Dink Ink Jet plastic, but since your tags will be very tiny you may as well save a few dollars and simply purchase the white plastic. I don't like to use the clear plastic. it looks a bit flimsy to me, even when shrunk.
In addition to shrink plastic you will need:
- a standard 1/4" hole punch
- a pencil with eraser
- a permanent markers
- a printout of the template provided in these instructions
- a pair of scissors

Shrinky Dinks shrink approximately 1/3 their size. I use a standard hand-held hole punch (6mm hole size) to make the holes for jump rings, so my starting un-shrunk width needs to be at least 10 mm to give a nice sturdy border of 2mm around the hole. I'll make the overall length 30mm to get a nice rectangle.
Here is a template for an oval tag and a round tag. Right click to copy it and then paste it into Microsoft Word so you can print it Then transfer it to your shrink plastic by tracing. Or print this page at normal size to get the correct dimensions.
Here are templates for the Ink Jet Shrinky Dink paper. They contain 166 tags each. Their Original size is 72 pixles/inch on an 8"x10" canvass. I intentionally made the borders very light so it's won't show up much upon printing and shrinking. This way you can go over it and add your own color border or graphics.

Once you have your template traced (or printed, follow the instructions that comes with your Shrinky DInk Ink Jet paper) begin decorating or signing your name on each tag. Sharpie brand Fine Point Permanent Markers work best and won't smudge even after shrinking. They also come in a variety of colors. I simply sign and date a tag once I have completed a piece of jewelry. Then shrink the tag in my toaster oven and attach it to the piece with jump rings.

Before shrinking be sure all tags are cut out and holes are punched. Punch the holes with a standard 1/4", light duty, hand held hole punch. Pardon my sloppy rounded edges. I started with the square template but decided I wanted round after they were cut out.

Erase the pencil marks once the tags are cut out. Now follow the instructions for shrinking your plastic. Assuming you used White Shrinky Dink brand shrink plastic, follow the Shrinky Dink Shrinking Baking Instructions
Your finished product will look something like this:

No comments:
Post a Comment